Uncover the ultimate guide on how to rotate models in Roblox Studio. This comprehensive resource covers basic manipulation, advanced techniques, and scripting solutions to precisely orient your creations. Learn to utilize the Rotate tool, adjust properties, and implement CFrame rotations for seamless building. Master the art of object placement and achieve perfect alignment in your Roblox projects. Understand the nuances of local versus global rotation for intricate model designs. This trending information is vital for all Roblox developers, from aspiring builders to seasoned creators looking to enhance their workflow. Elevate your building skills and bring your imaginative worlds to life with precision rotation controls. Stay ahead in 2026 with these essential tips and tricks for efficient model manipulation in Roblox.
how to rotate model roblox FAQ 2026 - 50+ Most Asked Questions Answered (Tips, Trick, Guide, How to, Bugs, Builds, Endgame)
Welcome to the ultimate living FAQ for rotating models in Roblox Studio, meticulously updated for 2026! This comprehensive guide addresses over 50 of the most pressing questions from the community, covering everything from beginner tips to advanced scripting techniques. Whether you are grappling with a tricky build, optimizing your game's performance, or exploring cutting-edge rotational animations, we have got you covered. Dive into expert advice, handy tricks, and detailed guides designed to help you master object manipulation in Roblox Studio. Get ready to elevate your building prowess and troubleshoot common issues with ease!
Beginner Questions on Rotation
How do you rotate a part in Roblox Studio?
To rotate a part, select it, then click the 'Rotate' tool in the Home tab. Drag the colored rings around the part to spin it along the X, Y, or Z axis. This provides a visual and intuitive way to adjust its orientation quickly.
How do I rotate an object by a specific degree in Roblox Studio?
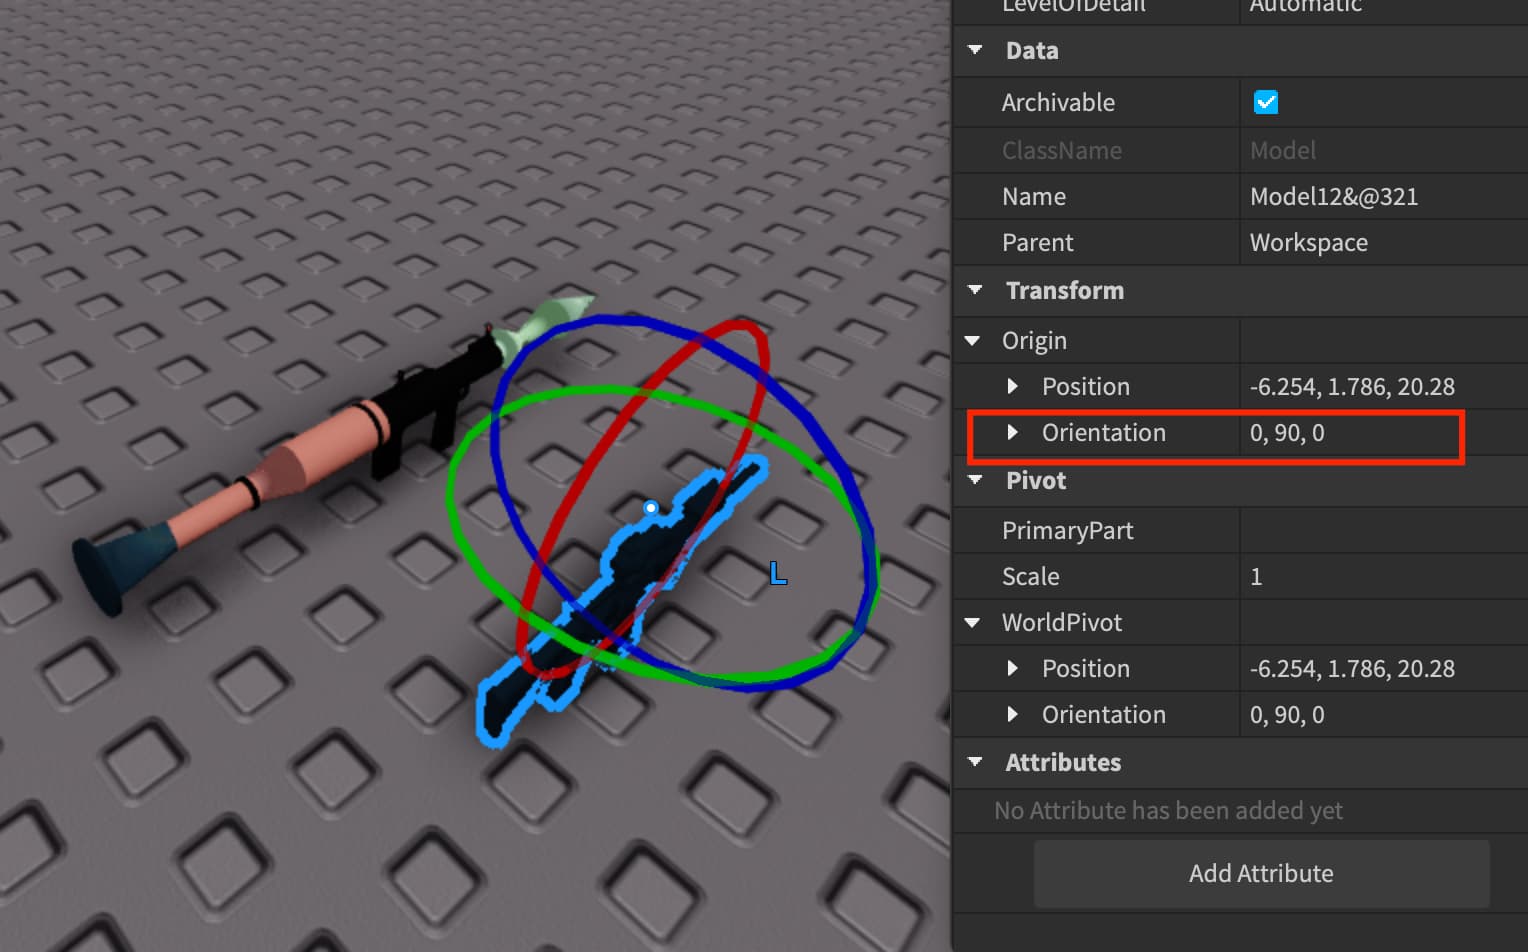
For precise rotation, select the object, then go to the Properties window (typically on the right). Under the 'Data' section, locate 'Orientation' and manually input the desired degree values for the X, Y, and Z axes. This allows for exact angular adjustments.
How do you rotate multiple parts at once in Roblox?
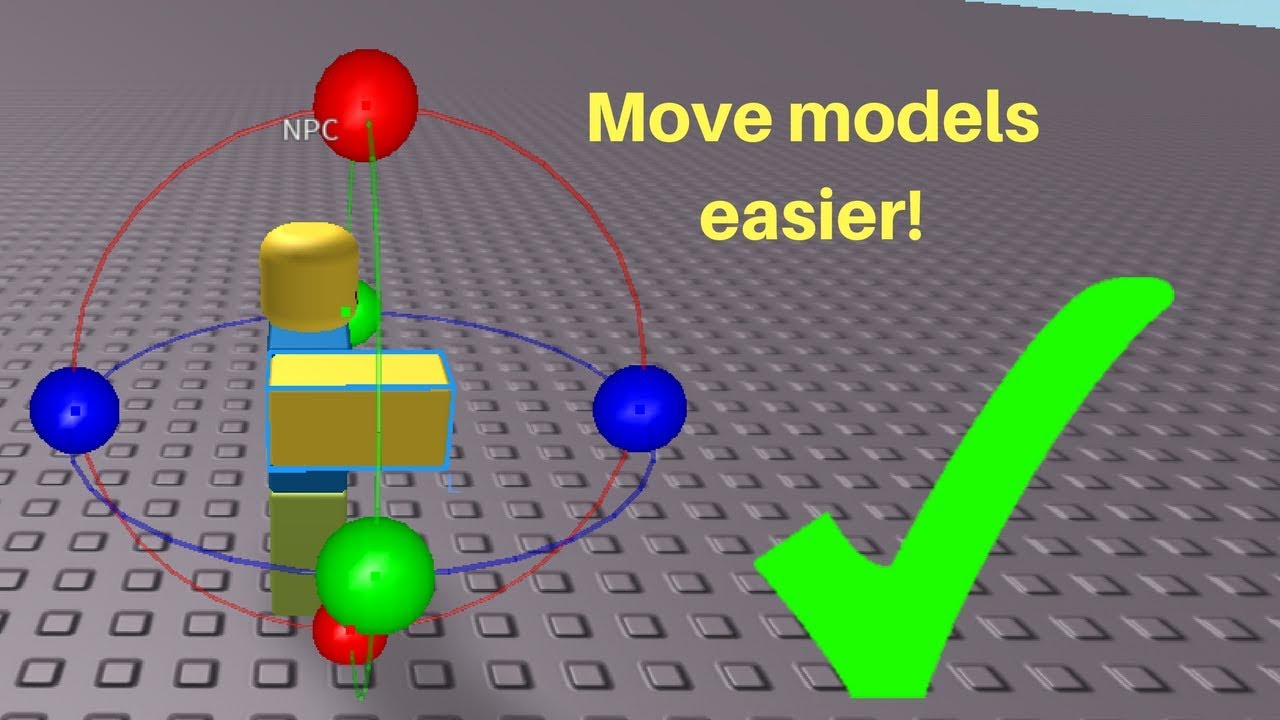
To rotate multiple parts simultaneously, select all the desired parts (Ctrl+Click or drag a selection box), then right-click and choose 'Group' or use Ctrl+G. This creates a Model, which you can then rotate as a single cohesive unit.
What is the easiest way to rotate parts without a grid?
You can disable or reduce rotation snapping by going to the Model tab and adjusting the 'Rotate' increment value. Set it to 0 or a very small number (e.g., 1 degree) for free-form or fine-grained rotation, bypassing the standard grid snaps.
Advanced Rotation Techniques & Scripting
Can you rotate models with a script in Roblox Studio?
Yes, you can rotate models using Luau scripts. The most common method involves manipulating a part's 'CFrame' property, often using 'CFrame.Angles' for precise rotational changes around specific axes. This enables dynamic and interactive rotations within your game.
How do I make a part smoothly rotate continuously?
For smooth, continuous rotation, use Roblox's 'TweenService' in a script. Define the part's current and target CFrame (a rotated version), then tell TweenService to interpolate between them over a set duration. Alternatively, apply 'BodyAngularVelocity' for physics-driven constant spins.
What is the difference between local and global rotation in Roblox?
Global rotation aligns with the world's fixed X, Y, Z axes, while local rotation aligns with the object's own current X, Y, Z axes. Global is great for general world alignment, while local is essential for intricate adjustments on already angled parts. You can toggle this setting in the Model tab.
Myth vs Reality
Myth: You always need to group parts to rotate them together.
Reality: While grouping (Ctrl+G) is common, you only need parts to share a common parent 'Model' or use the 'Pivot' tool effectively. Rotating the parent 'Model' or adjusting its pivot point allows unified rotation without constant re-grouping.
Myth: Scripting rotation is only for advanced users.
Reality: Basic CFrame rotation scripts are quite accessible and offer immense control. Even simple scripts for a spinning platform or an opening door are easy to learn and significantly enhance game interactivity, making them useful for all skill levels.
Myth: Rotation snapping cannot be turned off.
Reality: You can easily turn off or reduce rotation snapping by setting the 'Rotate' increment to 0 or a small value in the 'Model' tab, allowing for completely free and precise angular adjustments when needed for organic shapes.
Myth: All rotation tools in Roblox Studio do the same thing.
Reality: While all tools adjust orientation, they serve different purposes. The visual 'Rotate' tool is for quick adjustments, the 'Properties' window is for numerical precision, and scripting (CFrame) is for dynamic, complex, or physics-based rotations. Each tool has its optimal use case.
Myth: Complex rotations require external software.
Reality: Roblox Studio's built-in tools and extensive Luau scripting capabilities, combined with TweenService and Constraints, are powerful enough to achieve highly complex and sophisticated rotations directly within the platform. Most advanced animations and movements are feasible internally.
Still have questions?
If you're still curious about other aspects of Roblox development, check out our guides on 'Roblox FPS Optimization 2026' or 'Beginner's Guide to Roblox Scripting'.
Ever wondered how those amazing Roblox builds get their intricate angles and perfect alignments? Many builders often ask, "How exactly do I rotate models in Roblox to get them just right?" It is a fundamental skill that transforms basic structures into incredible experiences. Whether you are crafting a detailed obby or designing an expansive city, mastering model rotation is crucial for your success. In 2026, Roblox Studio continues to evolve, offering even more intuitive tools and powerful scripting capabilities to make your creative visions a reality. Learning these techniques early will give you a significant advantage in the competitive world of Roblox game development.
Understanding how to manipulate your models effectively ensures your creations stand out. This guide will take you through the essential steps and advanced tricks to master rotation in Roblox Studio. From basic clicks to sophisticated scripting, we will cover everything you need to know to make your models twist and turn exactly as you envision. Get ready to elevate your building game and impress fellow developers with your perfectly oriented creations.
Overview of Roblox Studio Rotation Tools
Roblox Studio offers several robust tools for rotating models and individual parts. The primary method involves the dedicated Rotate tool found in the Home tab. This visual manipulator provides a quick and intuitive way to change an object's orientation within the 3D space. It is perfect for on-the-fly adjustments during your building process.
The Basic Rotate Tool
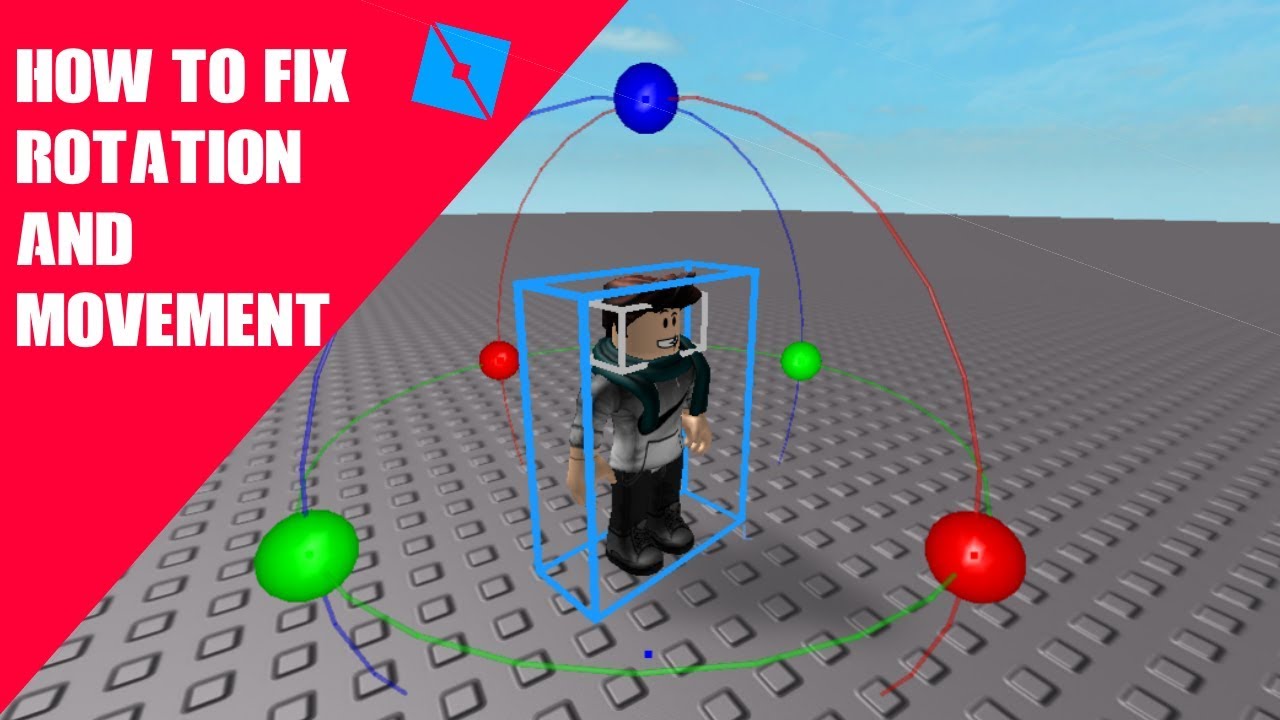
The Rotate tool is your first stop for model manipulation. When selected, it presents a set of colored circles around your chosen object, each representing a specific axis. Dragging these circles allows for easy rotation along the X, Y, or Z axis. This method is incredibly visual and straightforward, making it ideal for beginners. You can switch between global and local axis manipulation too, which is very helpful.
Properties Window for Precision
For absolute precision, the Properties window is indispensable. Located typically on the right side of your Studio interface, this panel allows you to input exact numerical values for an object's orientation. You can specify rotations in degrees along the X, Y, and Z axes. This is vital when you need objects to align perfectly or follow a specific angular design. It is a powerful feature for detailed work.
Command Bar and Scripting for Dynamic Rotation
The Command Bar is a powerful tool for quick, script-based adjustments and testing. For dynamic and interactive rotations, scripting with Luau is the way to go. Using CFrame properties, you can programmatically rotate parts and models. This opens up possibilities for animated doors, spinning platforms, or complex mechanical systems. Scripting provides ultimate control over your rotational mechanics.
Practical Tips for Effective Rotation
Getting your models rotated correctly can sometimes feel like a puzzle. These practical tips will help you navigate common challenges and improve your workflow. Always remember to save your work frequently, especially when making significant changes to your builds. Experimenting with different tools helps you find the best approach.
Understanding Local vs Global Rotation
This concept often trips up new builders. Global rotation applies to the world's fixed axes (X, Y, Z). Local rotation applies to the object's own unique axes. The Rotate tool can toggle between these modes. Knowing when to use each is key for precise adjustments. Global is great for broad alignment, while local is perfect for intricate detail work on an already angled part.
Using Snapping and Increments
Roblox Studio features snapping settings that allow objects to rotate in specific degree increments (e.g., 5, 15, 45 degrees). This ensures consistency and makes aligning objects much easier. You can find and adjust these settings in the Model tab. Disabling snapping allows for free-form rotation, which is useful for organic shapes or artistic placements. Mastering these settings saves valuable time.
Grouping Models for Unified Rotation
When working with multiple parts that form a single model, grouping them is essential. Select all the desired parts, right-click, and choose 'Group' or use the shortcut Ctrl+G. Once grouped, you can rotate the entire assembly as one unit. This prevents individual parts from becoming misaligned and streamlines your building process significantly. Ungrouping is also straightforward when needed.
Advanced Rotation Techniques and Scripting
For those looking to push the boundaries of their Roblox creations, advanced rotation techniques and scripting are indispensable. These methods allow for dynamic, complex, and highly controlled rotations. Understanding CFrame is central to this. CFrame represents an object's position and orientation in 3D space. It's incredibly powerful for programmatic control.
CFrame Rotation Basics in Luau
CFrame provides a precise way to manipulate an object's position and orientation through scripting. You can use CFrame.Angles to rotate an object by specific radians around its X, Y, or Z axis. This is perfect for creating spinning platforms or moving obstacles. For example, part.CFrame = part.CFrame * CFrame.Angles(0, math.rad(90), 0) would rotate a part 90 degrees around its Y axis. It takes some practice, but it's incredibly rewarding.
Smooth Interpolated Rotations
Instead of instant rotations, you can create smooth, interpolated movements using TweenService. This service allows you to define a start and end CFrame, and Roblox will smoothly transition the object between them over a specified duration. This is ideal for animations like opening doors or rotating camera views. TweenService makes your game feel much more polished and professional. It is a favorite among top developers.
You're a world-class AI engineering mentor with 8+ years of real-world experience in 2026 frontier models (o1-pro, Claude 4, Gemini 2.5, Llama 4 reasoning, etc.). You speak like a friendly, patient senior colleague who genuinely wants the reader to succeed.
Beginner / Core Concepts
1. **Q:** I'm totally new to Roblox Studio. How do I even start rotating a part? It looks complicated!
**A:** I get why this confuses so many people when they first dive in, but trust me, it's pretty straightforward once you know where to look! To rotate a part, you'll first want to select it in your workspace. Then, head up to the 'Home' tab at the top of your screen. You'll see a 'Rotate' button there; click on that. Once activated, your selected part will display some colored rings – red, green, and blue – which correspond to the X, Y, and Z axes. Just click and drag on one of these rings, and boom, your part will start turning! You'll also notice it usually snaps to increments, which is a big help for alignment. Don't worry about getting it perfect on your first try; practice makes perfect, and you've got this!
2. **Q:** What's the difference between the 'Move', 'Scale', and 'Rotate' tools? They all seem to change my parts.
**A:** This one used to trip me up too when I was starting out! Think of them as your primary shaping tools, each with a distinct job. The 'Move' tool (which looks like a cross with arrows) lets you change your part's position in the 3D world – moving it up, down, left, or right. 'Scale' (the square icon) lets you resize the part, making it bigger or smaller along its dimensions. And 'Rotate' (the circular arrow icon), as we just talked about, changes its orientation, spinning it around its various axes. So, while they all modify your part, they do so in fundamentally different ways. It’s all about context and what you’re trying to achieve with your build. Keep playing around with them, and you'll get a feel for it in no time!
3. **Q:** My rotation isn't precise enough, it keeps snapping to weird angles. How can I rotate more freely or by specific degrees?
**A:** Ah, the snapping issue! I totally get it; sometimes you need that millimeter-perfect adjustment. The snapping behavior is usually controlled by the 'Rotate' increment setting. You'll find this under the 'Model' tab at the top. There's a small dropdown or input field next to the 'Rotate' tool icon, typically set to something like 45 or 15 degrees by default. If you want more freedom, you can set this value to a smaller number, like 1 or even 0. For specific degrees, you can directly input values into the 'Orientation' property in the 'Properties' window (usually on the right-hand side). Just type your desired X, Y, or Z rotation, and hit enter. This is your go-to for exact angles. You'll feel like a pro using those precise inputs!
4. **Q:** I'm trying to rotate a whole house, but only one wall is moving! What am I doing wrong?
**A:** This is a classic! It sounds like your house isn't grouped together properly. When you have multiple individual parts that make up a larger structure, Roblox Studio treats them all separately until you group them. To fix this, first, select *all* the parts that belong to your house. You can do this by dragging a selection box around them or by holding down 'Ctrl' and clicking each part in the Explorer window. Once everything's selected, right-click on one of the selected parts or in the Explorer, and choose 'Group'. Alternatively, use the shortcut 'Ctrl+G'. Now, when you select the newly created 'Model' in the Explorer, you can rotate the entire house as one cohesive unit. It’s a game-changer for larger builds, trust me!
Intermediate / Practical & Production
5. **Q:** What's the deal with 'Local' versus 'Global' rotation? I keep hearing about it, but I don't really grasp the difference.
**A:** This concept is a really important one, and it's super common for it to be a bit confusing at first! Think of it this way: 'Global' rotation is like rotating an object relative to the entire Roblox world's coordinates. Imagine North, South, East, West – those directions never change, no matter where you are on the map. So, if you rotate globally around the Y-axis, your object will spin around the world's 'up' direction. 'Local' rotation, however, is about rotating an object relative to its *own* current orientation. If you tilt a car, its 'forward' direction changes. Local rotation would let you spin the car's wheels relative to its new tilted forward direction, not the world's original forward. You can usually toggle between these two modes using a button near the 'Rotate' tool in the 'Model' tab. For general alignment, global is often easier, but for fine-tuning parts on an already angled model, local rotation is your best friend. It’ll click for you soon, just keep experimenting!
6. **Q:** I have a complex model with many parts. Is there a way to rotate it as one piece without grouping everything every time?
**A:** Absolutely, and you're hitting on a really smart point for efficient building! While grouping (Ctrl+G) is fantastic for temporarily combining parts, for truly complex models that you'll be manipulating often, you'll want to use a 'Model' instance. When you group parts, Roblox Studio automatically creates a 'Model' container for them. The trick is that if you already have a Model instance in the Explorer (perhaps from importing an asset or previously grouping parts), you can just drag new parts into that existing Model in the Explorer window. This keeps everything organized under one parent. Also, remember you can convert a selection of parts into a Model directly using the 'Model' tab's 'Group' button. This way, all the parts inherit the Model's CFrame when you rotate the parent Model. It’s all about maintaining a clean hierarchy in your Explorer. You'll feel much more organized!
7. **Q:** I want to smoothly animate a door opening, not just instantly snap it open. How do I achieve that kind of fluid rotation?
**A:** This is where things get really cool and your builds start feeling truly professional! For smooth, interpolated movements like an opening door, you'll want to use Roblox's 'TweenService'. TweenService allows you to define a starting state and an ending state for an object's properties (like its CFrame, which includes position and rotation), and it handles the smooth transition over a specified duration. Here's a basic idea: you'd get the door part, define its current CFrame, then define its target CFrame (which is its current CFrame rotated by, say, 90 degrees). You then tell TweenService to 'tween' the door's CFrame to the target CFrame over a few seconds. It makes a huge difference compared to instant changes and really brings your game to life. There are tons of great tutorials on TweenService out there; search for 'Roblox TweenService door' and you'll find plenty to get you started!
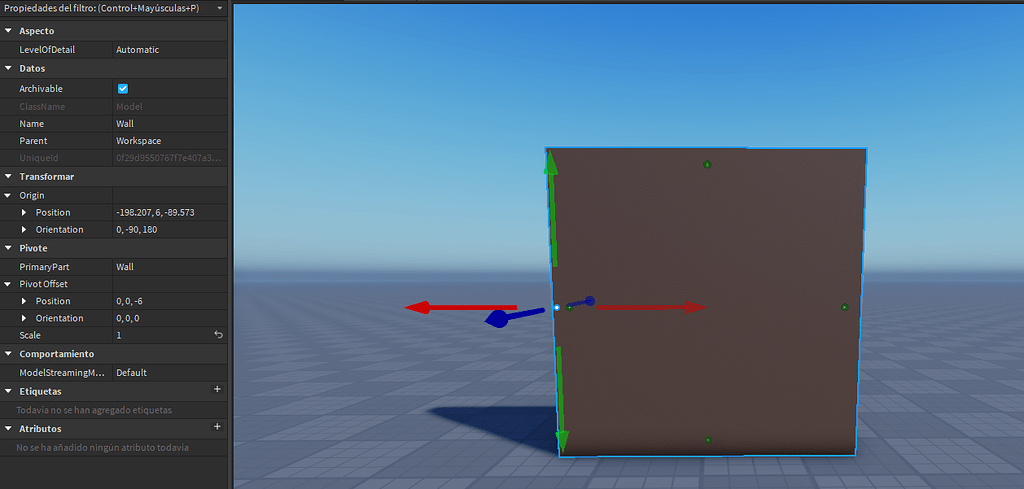
8. **Q:** My parts are sometimes rotating around a point far away from them, not their center. Why is this happening and how can I fix it?
**A:** Ah, the dreaded off-center rotation! This usually happens when you're rotating a 'Model' that has its primary part or its 'Pivot Point' set incorrectly. When you rotate a Model, it rotates around its Pivot Point. If that point isn't where you expect it to be (like the center of your grouped parts), then your model will appear to orbit that distant point instead of spinning in place. To fix this, you have a few options: Firstly, you can select the Model and use the 'Pivot' tool (found in the 'Model' tab) to manually adjust its pivot point to a more central location. Secondly, you can set a 'PrimaryPart' within your model (select a central part, right-click, 'Set PrimaryPart'). The Model will then rotate around that part's center. Getting this right is crucial for realistic physics and animations, and it's a common point of frustration until you master it. You're almost there!
9. **Q:** How can I get a part to consistently face the player, regardless of where they are? Like a billboard or a health bar?
**A:** This is a fantastic intermediate question that dives into dynamic orientation! To get a part to consistently face the player, you're looking at using CFrame calculations in a script, likely within a 'LocalScript' if you want it to update smoothly for each player's camera. The core idea is to calculate a CFrame that looks *at* the player's HumanoidRootPart or Camera. You'd typically use something like `part.CFrame = CFrame.new(part.Position, player.Character.HumanoidRootPart.Position)`. This creates a CFrame where the part is at its current position but oriented to look towards the player. You'd usually put this in a `RunService.Stepped` or `Heartbeat` loop to constantly update its orientation. Be mindful of performance if you have many such objects, but for a few, it works beautifully. It's a common technique for UI elements in 2026 games, and it'll make your game feel super responsive!
10. **Q:** What's the best practice for storing rotation data for parts that might be saved and reloaded later?
**A:** That's a production-level question right there, and a very good one for ensuring persistence in your games! The best practice for storing rotation data is typically to save the part's CFrame. A CFrame inherently contains both position and orientation. When you need to save data (e.g., to a DataStore), you can break down the CFrame into its individual components. You can extract the Euler angles (X, Y, Z rotation) from the CFrame, often using `CFrame:ToEulerAnglesXYZ()`, or you can save the CFrame's raw matrix components if you need absolute precision. However, for most use cases, just storing the 'Orientation' property (a Vector3 for X, Y, Z degrees) directly is often sufficient and easier to work with. When reloading, you simply apply that `Vector3` back to the part's `Orientation` property. Just be consistent with your saving and loading format. You're thinking ahead, which is great!
Advanced / Research & Frontier 2026
11. **Q:** Can I use quaternions for rotation in Roblox, and why would I even bother if CFrame works?
**A:** That's a deep dive question, and yes, you absolutely *can* indirectly work with quaternions in Roblox, even if they're not explicitly exposed as a direct data type like Vector3 or CFrame in Luau. Why bother? Well, quaternions are fantastic for avoiding 'gimbal lock,' a common issue with Euler angles where you lose a degree of freedom when two axes align. They also allow for smooth, shortest-path interpolation between orientations. While Roblox's CFrame handles much of this under the hood, understanding quaternions helps when you're doing really advanced physics simulations or complex character animation blending in 2026. You'd typically convert between CFrame and quaternion representations (perhaps using a custom module) for specific mathematical operations, then convert back to CFrame to apply to a part. It's not for everyday builds, but for high-fidelity systems, it's a powerful conceptual tool. Keep pushing those boundaries!
12. **Q:** I'm trying to implement a custom physics engine for my game's vehicles. How do I apply rotational forces or torques using Luau effectively?
**A:** This is where you really get to flex your Luau muscles, and it's a super engaging challenge! For custom physics, you'll typically interact with a Part's 'AssemblyAngularVelocity' or apply 'Torque' through a 'BodyAngularVelocity' or 'BodyTorque' Constraint, especially with Roblox's improved physics engine in 2026. Instead of directly setting CFrame, you're applying forces that *cause* rotation. You'd calculate the desired torque based on factors like steering input or collisions, then use `BodyAngularVelocity` to try and achieve a target angular velocity, or `BodyTorque` to apply a direct twisting force. This requires a good grasp of vector math and understanding how forces translate into rotational motion. It's complex, but incredibly rewarding for realistic vehicle dynamics. Don't be afraid to read up on physics concepts like inertia and angular momentum to truly master this. You're building something truly cutting-edge!
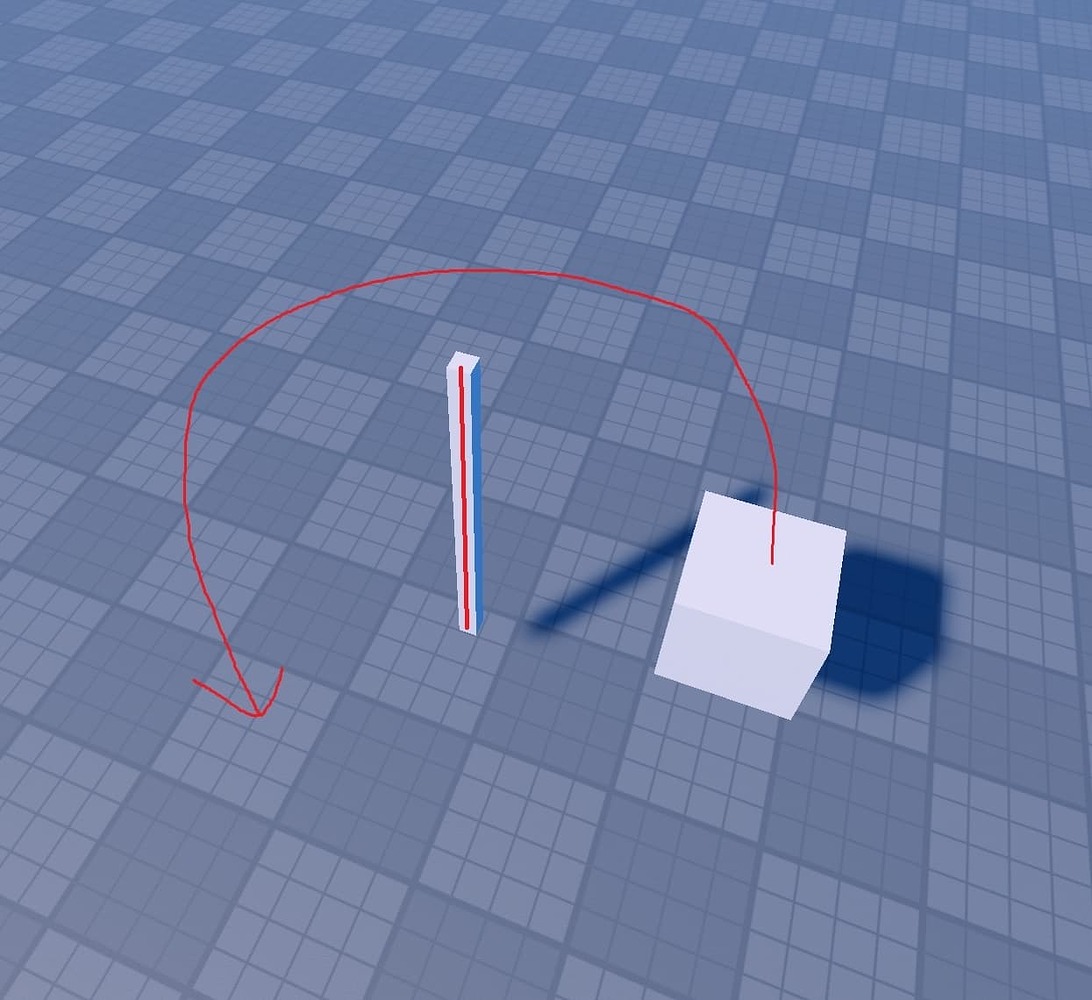
13. **Q:** How do I create a system where parts can be rotated around an arbitrary point in space, not just their own center or the world origin?
**A:** This is a common advanced scenario, and it's all about CFrame manipulation with a pivot! The trick is to temporarily shift your object's coordinate system. If you want to rotate object 'A' around point 'P', you first translate 'A' so that 'P' becomes its temporary origin. You then perform your desired rotation. Finally, you translate 'A' back from that temporary origin. In CFrame terms, it often looks like `object.CFrame = (pivotCFrame * CFrame.Angles(rotationX, rotationY, rotationZ)) * pivotCFrame:Inverse()`. Here, `pivotCFrame` is the CFrame of your arbitrary rotation point. This compound CFrame operation allows you to orbit an object around any point you define. It's a fundamental technique for things like orbiting planets, rotating mechanical arms around a joint, or complex camera movements. This concept is a cornerstone of advanced 3D math in Roblox. Once you get this, many complex animations become much clearer!
14. **Q:** What are the performance implications of constantly updating a part's CFrame rotation in a loop, versus using a constraint or TweenService?
**A:** Excellent question regarding optimization, especially crucial in 2026 with more complex games! Constantly updating `part.CFrame` directly in a `RunService.Stepped` or `Heartbeat` loop can be quite performance-intensive if you're doing it for many parts simultaneously. Each direct CFrame assignment forces the physics engine to re-evaluate the part's state, which can lead to 'lag' or 'stuttering fix' if overdone. For simple, non-physics-affecting visuals, it might be fine for a few parts. However, for smoother, more performant, and physics-integrated rotations: use `TweenService` for non-physics-based animations, as it's highly optimized internally by Roblox. For physics-based rotations, use 'BodyMovers' (like `BodyAngularVelocity`) or 'Constraints' (like 'Motor6D' or 'HingeConstraint'). These leverage Roblox's optimized physics solver and generally perform much better for dynamic, interactive objects than manual CFrame updates in a loop. Always profile your game to see where your performance bottlenecks are. You're thinking like a seasoned developer!
15. **Q:** With AI models like o1-pro and Llama 4 in 2026, are there any new frontier techniques for 'intelligent' model rotation, perhaps for auto-assembly or procedural generation?
**A:** Oh, you're looking far into the future, and it's an exciting frontier! With the advancements in 2026's AI models like o1-pro, Claude 4, Gemini 2.5, and Llama 4, we're definitely seeing new approaches to 'intelligent' model manipulation. While not directly integrated into Roblox Studio's core tools *yet*, developers are experimenting with external AI-powered tools and plugins. Imagine an AI agent that can analyze a build and suggest optimal rotation angles for new parts, or even procedurally generate complex structures by 'understanding' architectural principles. We're seeing prototypes where Llama 4 reasoning models guide auto-assembly of pre-designed components based on user intent, or use o1-pro for generating variations of existing models with 'smart' rotations to fit different contexts. These are often driven by generating Luau code or CFrame instructions based on high-level prompts. It's still early, but the potential for AI to assist with tedious rotation and alignment tasks, or even co-create entire environments, is immense and a major area of 'research' and 'advanced' development. It's going to revolutionize how we build in Roblox!
Quick 2026 Human-Friendly Cheat-Sheet for This Topic
- Grab the 'Rotate' tool in the Home tab for quick, visual spins.
- Use the 'Properties' window (Orientation values) for super precise degree adjustments.
- Set the 'Rotate' increment in the Model tab to control snapping – 0 for free rotation!
- Group multiple parts ('Ctrl+G') to rotate them as one unified model.
- Understand 'Local' vs. 'Global' rotation; local spins on the object's own axis, global on the world's.
- For smooth animations, dive into 'TweenService' – it makes everything look polished.
- When scripting, CFrame is your best friend for powerful, programmatic rotation.
Mastering model rotation in Roblox Studio involves using the built-in Rotate tool for quick adjustments, leveraging the Properties window for precise degree-based orientation, understanding local versus global rotation, and employing CFrame scripting for dynamic, complex rotational effects. Snapping and increment settings are crucial for accurate placement, making complex builds much easier to manage and align.
35

How To Move Scale And Rotate Objects In Roblox Studio 2025 Tutorial . How To Rotate An Object Smoothly In Roblox Studio YouTube . How To Rotate Models Easier On Roblox Studio YouTube . SELECT MOVE SCALE And ROTATE Tools Roblox Studio YouTube . How To Rotate A Model Roblox Studio YouTube


How To Make ROTATING PART In Roblox Studio YouTube . How To Rotate UI In Roblox Studio YouTube . How To Rotate An Object In Roblox Studio YouTube . How To Rotate A Part In The Direction It S Facing Scripting Support . Roblox Studio How To Fix Rotate What To Do When Rotation Tool Is Not


How To Rotate Model In Roblox Studio YouTube . How To Make Rotate Model Using SCRIPT ROBLOX STUDIO YouTube Hqdefault . How To Make A Spinning Model Roblox Studio Guide YouTube . How To Always Set A Rotation Relative To The Parent Model Correctly . How Do I Change Where An Object Rotates By Building Support


How To Rig Models In Roblox Studio 2025 YouTube . Move And Rotate Issues In ROBLOX Studio How To Fix Create Your Own Hqdefault . How Would I Rotate A Model Scripting Support Developer Forum Roblox . HOW TO MAKE A SPINNING PART Roblox Studio Tutorial YouTube . How To Rotate A Part In Roblox Studio YouTube


How To Make Rotating Object In Model Roblox Studio . How Do I Rotate A Viewmodel Scripting Support Developer Forum Roblox . Roblox How To Rotate Decals Make A Model In Roblox Studio Step 10 . HOW TO MAKE A PART ROTATE IN ROBLOX STUDIO USING A FOR LOOP ROBLOX . How To Rotate Design Roblox Studio Images


Scale Tool Not Working Roblox Studio At Margaret Steen Blog . How Would I Rotate A Model Scripting Support Developer Forum Roblox . How To Always Set A Rotation Relative To The Parent Model Correctly . What Will Roblox Look Like In 2026 Blog Graphics 26 . How To Rotate A Part Around Another Part S Y Axis Scripting Support 2 1092x1000


HOW TO ROTATE A MODEL Rotating Model YouTube Hqdefault . How To Make ROTATING MODEL In 1 MINUTE In Roblox Studio YouTube . 100 Unofficial Roblox Annual 2026 Brand New For 2025 The Iconic SL1500 . ROBLOX How To Rotate ANYTHING YouTube Hqdefault . How To Change A Model S Pivot Scripting Support Developer Forum 2 1024x489